前言:本文深入浅出地介绍了Docker部署一个完整项目的流程,从Docker基础命令,到Dockerfile的编写,再到Docker容器之间的网络通信,相信完整看完会对Docker部署流程有很清晰的了解。
本文流程:
- 基本知识;
- Docker镜像的构造;
- 双容器互联;
- 总结。
基本知识
本段主要介绍Docker的概念和Django的开发模式。
Docker
Docker的出现很大程度减少了很多“我的代码在本地上跑的了,但是在其他人电脑上出现一堆bug的情况”。提供一键部署,一键运行的高效服务。
- Dockerfile
Dockerfile其实就是一个脚本文件,类似于linux中的.sh文件,它里面包含一堆有关需要构建镜像需要的环境、依赖等等。下面是一个构建centos并定义两个挂载目录的例子:
xxz@zzz:~/docker_test$ pwd
/home/xxz/docker_test
xxz@zzz:~/docker_test$ vim dockerfile1
--------------------
# Dockerfile内容, 创建一个dockerfile
# 文件中内容 指令(大写) 参数
FROM centos
VOLUME ["volume01", "volume02"]

CMD echo "--------end----------"
CMD /bin/bash
--------------------
# 使用docker build命令构建出镜像(不要忘记命名最后有个点,代表路径)
xxz@zzz:~/docker_test$ docker build -f dockerfile1 -t centos:1.0 .
构建镜像之后运行可以通过docker inspect命令可以看到自动创建的两个匿名挂载volume。
- 镜像和容器
总的来说就是通过编写Dockerfile,把项目里需要的环境、依赖、前置指令等等包含进去,Dockerfile通过build指令构建出项目镜像。其他人通过拉取pull镜像到本地,运行镜像,我的理解就是实例化镜像,构建出容器,镜像和容器是一对多的关系。
进入容器后就可以在里面做任何你想在之前项目做的任何事了(合理范围内)。构建容器还有很多可以操作的地方,比如像使用容器数据卷,把容器里的文件挂载在本地,这样在容器销毁时,数据还可以保留在本地中,相关内容后面在实例化Mysql容器时也会提到。
Django
在本项目中Django是一个通过MTV模式运行的pythonWeb框架,同时他通过ORM把项目中的类和数据库进行映射,可以让我们在操作类时就可以修改数据库的数据。本项目主要提到的就只有setting.py中数据库的配置和manage,py的脚本命令。
# Django-version
>>> import django
>>> print(django.VERSION)
(3, 1, 2, 'final', 0)
# 项目结构
xxz@zzz:~/Docker_Django$ tree -L 1
.
├── babys
├── commodity
├── Dockerfile
├── index
├── manage.py
├── media
├── pip.conf
├── pstatic
├── requirement.txt
├── shopper
├── static
├── templates
└── web.config
8 directories, 5 files
Docker镜像的构造
流程:整个Django项目通过Dockerfile映射成镜像,构建Mysql数据库.
Django容器的构造
- Dockerfile
2构建Django镜像ockerfile
# Build python3.7 env
FROM python:3.7

# author
MAINTAINER CC

# set the python env
ENV PYTHONUNBUFFERED 1

# create file
RUN mkdir -p /var/project/babys_master

# set the workdir
WORKDIR /var/project/babys_master

# add the Dockerfile dir into the docker workdir
ADD . /var/project/babys_master

# pip install Dependent package
RUN pip install -r requirement.txt

CMD echo "--------end----------"
2. 构建Django镜像
xxz@zzz:~/docker_test$ docker build -f Dockerfile -t babys_django_docker:02 .
3. 运行镜像
xxz@zzz:~/docker_test$ docker run -it -d --name baby_project02 -p 8010:8001 --link babys babys_django_docker:02
数据库容器的构建
- 查看版本号
xxz@zzz:~/docker_test$ mysql --version
mysql  Ver 8.0.27-0ubuntu0.20.04.1 for Linux on x86_64 ((Ubuntu))
2. 拉取镜像
xxz@zzz:~/docker_test$ docker pull mysql:8.0.27
8.0.27: Pulling from library/mysql
Digest: sha256:e9027fe4d91c0153429607251656806cc784e914937271037f7738bd5b8e7709
Status: Image is up to date for mysql:8.0.27
docker.io/library/mysql:8.0.27
3. 运行镜像生成Mysql容器
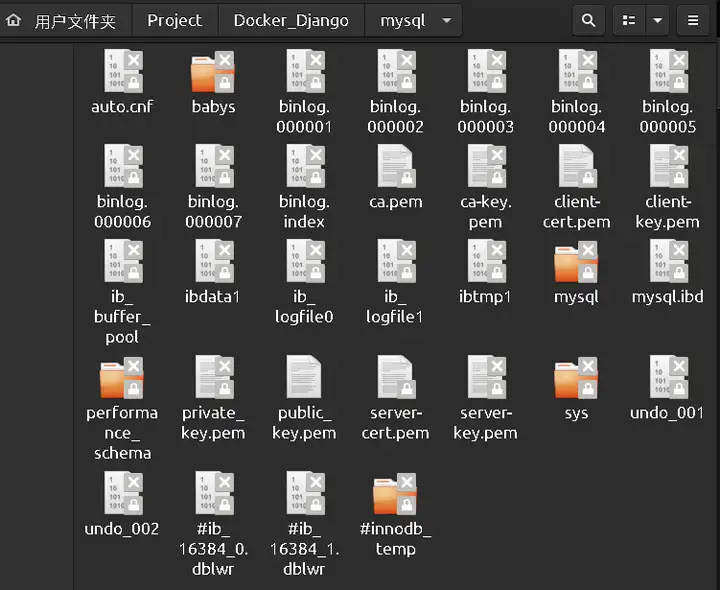
xxz@zzz:~/docker_test$ docker run -d -p 8080:3306 -v /home/xxz/Project/Docker_Django/mysql:/var/lib/mysql -e MYSQL_ROOT_PASSWORD=1234 --name babys mysql:8.0.27
-v主要通过把数据挂在在本地,完成对数据的持久化操作。

在本地挂载的数据库
通过以上两个部分的操作就构建好了两个容器了:
xxz@zzz:~/docker_test$ docker ps
CONTAINER ID   IMAGE                    COMMAND                  CREATED       STATUS         PORTS                                                  NAMES
7fe482035f40   babys_django_docker:02   "python3"                4 weeks ago   Up 3 seconds   0.0.0.0:8010->8001/tcp, :::8010->8001/tcp              baby_project02
b05bb80485a9   mysql:8.0.27             "docker-entrypoint.s…"   4 weeks ago   Up 7 minutes   33060/tcp, 0.0.0.0:8080->3306/tcp, :::8080->3306/tcp   babys
双容器互联
这里的容器网络互联就简单的用docker0来进行通信。
- Docker0是在配置Docker环境时本身自带的一个容器互联的网桥。可以看到这里docker0是
172.17.0.1;
xxz@zzz:~$ ifconfig
docker0: flags=4163<UP,BROADCAST,RUNNING,MULTICAST>  mtu 1500
        inet 172.17.0.1  netmask 255.255.0.0  broadcast 172.17.255.255
        inet6 fe80::42:cbff:febd:8017  prefixlen 64  scopeid 0x20<link>
        ether 02:42:cb:bd:80:17  txqueuelen 0  (以太网)
        RX packets 0  bytes 0 (0.0 B)
        RX errors 0  dropped 0  overruns 0  frame 0
        TX packets 87  bytes 15619 (15.6 KB)
        TX errors 0  dropped 0 overruns 0  carrier 0  collisions 0
2. 使用docker inspect {Docker_name or Docker_ID}查看对应容器的网络信息,可以看到一个是172.17.0.2,一个是172.17.0.3,而且他们的Gateway都是172.17.0.1;
# Django中
"Networks": {
                "bridge": {
                    "IPAMConfig": null,
                    "Links": null,
                    "Aliases": null,
                    "NetworkID": "998e720ef6b56eae1ca07c04a84db423d3811029bd7fbc50495c5b0a6fa3d206",
                    "EndpointID": "4c2e2c03fbfd86fb816c28499479c04d2a746c6eb497b155164274e634e0753c",
                    "Gateway": "172.17.0.1",
                    "IPAddress": "172.17.0.3",
                    "IPPrefixLen": 16,
                    "IPv6Gateway": "",
                    "GlobalIPv6Address": "",
                    "GlobalIPv6PrefixLen": 0,
                    "MacAddress": "02:42:ac:11:00:03",
                    "DriverOpts": null
                }
# Mysql中
"Networks": {
                "bridge": {
                    "IPAMConfig": null,
                    "Links": null,
                    "Aliases": null,
                    "NetworkID": "998e720ef6b56eae1ca07c04a84db423d3811029bd7fbc50495c5b0a6fa3d206",
                    "EndpointID": "0ff79ce5f02ec941141104f8556e8162936934c102e5aa6694578f09574906c9",
                    "Gateway": "172.17.0.1",
                    "IPAddress": "172.17.0.2",
                    "IPPrefixLen": 16,
                    "IPv6Gateway": "",
                    "GlobalIPv6Address": "",
                    "GlobalIPv6PrefixLen": 0,
                    "MacAddress": "02:42:ac:11:00:02",
                    "DriverOpts": null
                }
3. 进入Djangosetting.py中把数据库的HOST和PORT修改成Mysql容器暴露给docker0的IP和端口;
xxz@zzz:~/docker_test$ docker exec -it baby_project02 /bin/bash
root@7fe482035f40:/var/project/babys_master# ls
Dockerfile  babys  commodity  index  manage.py media  pip.conf  pstatic  requirement.txt  shopper  static  templates  web.config
root@7fe482035f40:/var/project/babys_master# vi babys/settings.py
----------------------
# Database
# https://docs.djangoproject.com/en/3.0/ref/settings/#databases

DATABASES = {
    'default': {
        'ENGINE': 'django.db.backends.mysql',
        'NAME': 'babys',
        'USER': 'root',
        'PASSWORD': '1234',
        'HOST': '172.17.0.2',
        'PORT': '3306',
    }
}
4. 在Django容器中使用python manage.py runserver 172.17.0.3.
root@7fe482035f40:/var/project/babys_master# python manage.py runserver 172.17.0.3:8001
Performing system checks...

System check identified some issues:

WARNINGS:
?: (urls.W002) Your URL pattern '/collect.html' [name='collect'] has a route beginning with a '/'. Remove this slash as it is unnecessary. If this pattern is targeted in an include(), ensure the include() pattern has a trailing '/'.
?: (urls.W002) Your URL pattern '/delete.html' [name='delete'] has a route beginning with a '/'. Remove this slash as it is unnecessary. If this pattern is targeted in an include(), ensure the include() pattern has a trailing '/'.
?: (urls.W002) Your URL pattern '/detail.<int:id>.html' [name='detail'] has a route beginning with a '/'. Remove this slash as it is unnecessary. If this pattern is targeted in an include(), ensure the include() pattern has a trailing '/'.
?: (urls.W002) Your URL pattern '/login.html' [name='login'] has a route beginning with a '/'. Remove this slash as it is unnecessary. If this pattern is targeted in an include(), ensure the include() pattern has a trailing '/'.
?: (urls.W002) Your URL pattern '/logout.html' [name='logout'] has a route beginning with a '/'. Remove this slash as it is unnecessary. If this pattern is targeted in an include(), ensure the include() pattern has a trailing '/'.
?: (urls.W002) Your URL pattern '/shopcart.html' [name='shopcart'] has a route beginning with a '/'. Remove this slash as it is unnecessary. If this pattern is targeted in an include(), ensure the include() pattern has a trailing '/'.

System check identified 6 issues (0 silenced).
January 22, 2022 - 04:47:08
Django version 3.1.2, using settings 'babys.settings'
Starting development server at http://172.17.0.3:8001/
Quit the server with CONTROL-C.
就表示成功连接上了,这里需要重点注意的是不能使用Django自己生成的localhost,需要使用容器暴露的IP和端口,只有这样才可打开网站,否则就是page not found error。
5. 其他:可以使用下面的命令也可以查看相应的IP信息。
xxz@zzz:~$ sudo iptables -t filter -L -n
--------------------
Chain DOCKER (1 references)
target     prot opt source               destination
ACCEPT     tcp  --  0.0.0.0/0            172.17.0.2           tcp dpt:3306
ACCEPT     tcp  --  0.0.0.0/0            172.17.0.3           tcp dpt:8001
总结
本文从Docker镜像的构建到容器的互联,需要读者对Docker的概念和命令有一定的了解。我在学习这方面的知识时才过了很多坑,查了很多资料才最后运行成功的,这篇文章也算是一个记录和对自己学的知识的回顾吧。
转载至知乎(氪制) https://zhuanlan.zhihu.com/p/460652113
评论列表
已有0条评论